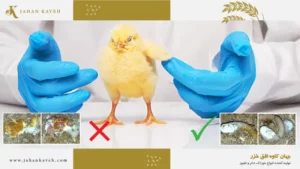
How to Disinfect a Poultry House
Raising chickens, whether on an industrial scale or a small hobbyist level, requires careful planning and step-by-step execution of various stages. Among these, chicken coop preparation holds particular significance. This process lays the foundation for healthy and productive chicken rearing and prevents the occurrence of diseases and potential problems.
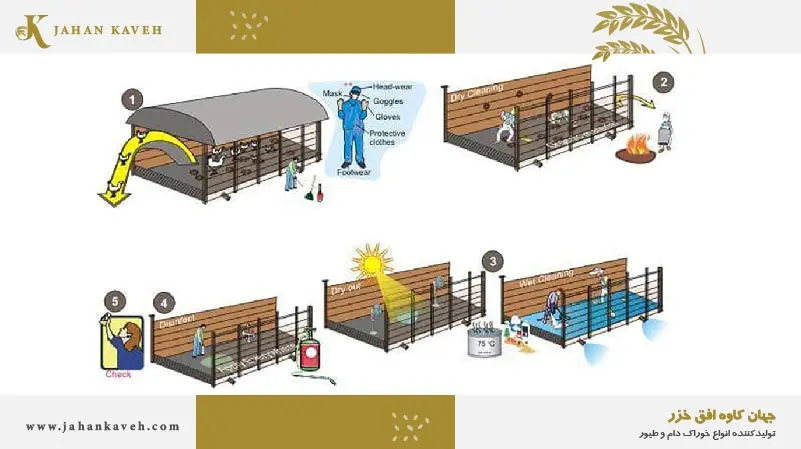
The poultry house preparation stages can be summarized as follows:
- Preparation and Pre-
- cleaning
- Dry Cleaning
- Wet Cleaning
- Equipment Inspection,
- Repair, and Testing
- Chicken Coop Disinfection
- Fumigation
- Sampling

Stage 1: Evacuation and Cleaning of the Broiler House
Eliminate all remaining waste from dead birds, feed, eggs, manure, and other sources. Disassemble and remove all movable and cleanable equipment. Collect and remove from the house any excess and moisture-sensitive items, such as thermostats, lamps, and thermometers. Thoroughly collect and remove all used bags for sealing air leaks and other purposes.
Stage 2: Dry Cleaning of the Broiler House
Sweep the entire house clean and remove any remaining debris with a shovel.Thoroughly clean and dust the walls and floor. Dust and clean all equipment. For thorough dry cleaning of a poultry house, the following must be done:
- Scraping the Floor: Scrape the floor of the house with a scraper to completely remove any remaining manure and organic matter from the floor and equipment.
- Dusting Electrical Equipment with Compressed Air and Brush: Use compressed air and a brush to dust electrical equipment.
- Covering Moisture-Sensitive Electrical Components with Plastic: Cover moisture-sensitive electrical components with plastic to prevent water ingress during washing. This includes the jet heater control board, jet solenoid valve, exhaust fan motor, feed auger motor, indoor control panels, and others.
Note: Before covering with plastic and after dusting, spray pure formalin solution (20 ml) on these equipment to effectively eliminate contamination and carryover to the next cycle.

Stage 3: Wet Cleaning of the Poultry House with Water and Detergent
In this stage, use hot (but not too hot) water and detergent to clean all equipment, walls, and floors of the poultry house. This will remove any remaining organic matter and grease. Brushing the house is essential for effective washing. After using the detergent, the floor of the house and at least one meter of the side walls must be brushed to remove all adhering manure and organic matter from the floor and walls. This step is very important and should be done with care and attention.
Under the bases of the jets, all traffic surfaces and traffic bases and chains, all inlet surfaces, air vent frames from the inside and outside, corners and breaks in the floor, pipes and round cross-section items, column heads and trusses, and other such items should be washed and cleaned with great care.
After brushing, the floor of the house should be washed with high-pressure water and great care. After this step, there should be no trace of dust on the surfaces of the inlets, threads, cables, power cables, water pipes, and no traces of manure on the floor and walls of the house. After washing the house and before disinfecting the house, the responsible person should carefully check all the above items. If necessary, any remaining minor defects should be corrected.
General Wet Cleaning Guidelines:
- Wash all indoor surfaces, including walls, floors, ceilings, equipment, and appliances with warm water and a suitable detergent.
- Use a brush and scrubber to remove any dirt or grime.
- After washing, rinse all surfaces thoroughly with clean water.
- Once the surfaces are completely dry, use a suitable disinfectant to disinfect all indoor surfaces.

Stage 4: Inspection, Repair, and Testing of Poultry House Equipment
Following the completion of cleaning, all equipment and appliances inside the house should be carefully inspected and repaired or replaced as needed. Ensure that all equipment, such as drinkers, feeders, ventilation, and lights, are in good working order. Carefully inspect the water and feeder systems (feeders) for leaks and ensure they are in good working order. Also, carefully inspect the ventilation, heating, and cooling systems to ensure they are functioning properly. Heating equipment is one of the most important aspects of chick rearing, as chicks do not have the ability to regulate their body temperature for the first 5 days, and this continues for up to 14 days of age.
Equipment Cleaning and Reinstallation:
Finally, all tools and equipment that were removed from the house before cleaning should be thoroughly cleaned and then installed for reuse in the houses (slippers, lamps, scales, thermostats, etc.). Be sure to check all items before the arrival of day-old chicks to ensure chicks have the best possible start.
Additional Considerations:
- Water and Feeder Systems: Check for leaks and ensure proper flow of water and feed.
- Ventilation Systems: Verify adequate air circulation and adjust settings as needed.
- Heating and Cooling Systems: Ensure proper temperature regulation and adjust settings as needed.
- Lighting Systems: Check for proper illumination and replace bulbs if necessary.
- Other Equipment: Inspect and test all other equipment, such as timers, alarms, and safety devices.

Stage 5: Disinfection of the Broiler House
If all previous stages have been completed with meticulous care, the disinfection stage will completely eliminate any remaining pathogens and microbes. In this regard, it is crucial to use only approved disinfectants.
Safety Precautions During Disinfection:
- Adhere to Instructions: Carefully read the instructions for use and follow the guidelines precisely.
- Proper Dosage: Use the recommended dosage of the disinfectant as per the protocol.
- Time and Temperature: Apply the disinfectant at the specified time and ensure the appropriate temperature.
- Personal Protective Equipment (PPE): Wear appropriate PPE, including gloves, goggles, and a mask, while handling the disinfectant.
- Clean Attire: Ensure all personnel enter the house wearing clean clothes and slippers.
- Footwear Disinfection: Disinfect footwear before entering the house.
Disinfection Procedures:
- Water System Disinfection: Fill the water system with water and a disinfectant for 24 hours. Thoroughly rinse the entire water system afterward to remove all traces of disinfectant from the pipes. Finally, seal the wastewater outlets of the house with plaster after thorough cleaning.
- Minimizing Entry: Minimize entry into the house during this stage to allow for proper drying and complete disinfection.
- External Disinfection: In addition to cleaning and disinfecting the poultry house, extend the disinfection process to the surrounding areas, including the workers’ quarters, management office, weighbridge room, engine room, warehouse, surrounding channels, and yard.
- Personnel Disinfection: Dust and vacuum clean the personnel’s rooms and blankets, followed by thorough disinfection. Wash all workers’ uniforms thoroughly with regular laundry detergents.
Critical Reminder: From this stage onward, it is imperative that personnel refrain from consuming any eggs or chicken, even in their own quarters.

Stage 6: Fumigation of the Poultry House
Types and Best Poultry House Disinfectants
Once the disinfection of the house and equipment is complete, fumigation should be carried out. Fumigation is a method of disinfecting and eliminating harmful disease-causing organisms in an enclosed environment. The substances used in fumigation include chemicals that are released into the air in the form of gas or smoke. The purpose of fumigation is to eliminate disease-causing organisms that can infect poultry. This is particularly important for the control of transmissible diseases such as fowl typhoid, pullorum, epidemic tremor, infectious bronchitis, and chronic respiratory disease (CRD).
Steps for Fumigation of the Poultry House:
- Determine the Internal Dimensions: Measure the length, width, and height of the poultry house.
- Seal Openings: Close all openings such as windows and vents with polyethylene sheets to prevent additional air from entering.
- Prepare a Container: Obtain a large, non-breakable, wide-mouthed container, such as an enamel or ceramic bowl, that can accommodate the volume of formalin and other materials.
- Ensure Optimal Conditions: Ensure the ambient temperature is around 24°C (75°F) and the relative humidity is 75%. Formaldehyde gas works best in a warm and humid environment.
- Measure Potassium Permanganate: Weigh the required amount of potassium permanganate (KMnO4) into the container. For single-strength fumigation, the required amount is 20 grams per 2.83 cubic meters (100 cubic feet).
- Measure Formalin: Measure the corresponding volume of formalin required. The volume is typically twice the weight of potassium permanganate.
- Add Formalin Safely: Slowly add the formalin to the KMnO4 (not vice versa).
- Secure the Poultry House: Lock the poultry house after adding the chemicals.
- Maintain Closure: Keep the house locked for 1 week.
After one week, open the doors and windows to allow the remaining gas to escape. Close the poultry house again until the day-old chicks arrive. If time is limited, keep the doors and windows closed for 24 hours to allow the disinfectant gas to fully take effect.
For poultry farmers, an effective disinfectant should possess the ability to eliminate a wide range of contaminants and bacteria. However, no single disinfectant can eradicate all types of microorganisms and pollutants. Therefore, to achieve optimal disinfection in poultry farms, poultry farmers consider the disinfection target, disinfectant characteristics, type of pathogens, and disinfectant properties. Consequently, an ideal poultry house disinfectant should exhibit the following characteristics:
- Eliminate a broad spectrum of bacteria at low concentrations
- Rapid action
- Non-toxic to humans, livestock, and poultry
- Environmental stability
- Odorless
- Water-soluble
- Effective at low temperatures
- Non-flammable and non-explosive
- Resilience to organic matter, acids, alkalis, and other physical and chemical agents
- No damage to metal, wood, plastic products, etc.
- Complete biodegradability and rinsability after thorough disinfection
- Affordability, accessibility, and ease of transportation
Formaldehyde: A Common Poultry House Disinfectant
Among the diverse disinfectants available in the market, formaldehyde is a prevalent choice in poultry houses. Formaldehyde, the first disinfectant used within aldehyde compounds, boasts a history of approximately 100 years. Formaldehyde solution exhibits strong antibacterial properties, eliminating bacteria, spores, protozoa, viruses, and fungi.
Poultry Formaldehyde Disinfectant Powder (0.5% – 2.5%) can eradicate all bacteria, spores, and viruses within 6 to 24 hours. Poultry farmers can utilize this powder for disinfecting houses, utensils, and poultry manure. Generally, this powder can be applied in solution for spraying on equipment, washing, or fumigation using formaldehyde vapor in the poultry house.
Typically, 28 ml/m³ of formaldehyde and 14 g/m³ of potassium permanganate are employed for poultry houses, warehouses, hatcheries, etc. Since potassium permanganate and formaldehyde solution generate significant heat, the formaldehyde evaporates and disinfects the house environment. In cases of severe contamination during the poultry house cycle, a higher dosage of formaldehyde and potassium permanganate can be used. However, maintain a 2:1 ratio, meaning twice as much formaldehyde as potassium permanganate.
Alternatively, this evaporation can be achieved by heating a formaldehyde solution in water. The disinfection process requires 12 to 24 hours. All enclosures that may allow air leakage must be sealed to prevent air escape and ensure complete disinfection. Upon initiating fumigation, personnel must immediately vacate the premises.
Fumigation and disinfection can also be accomplished by heating and evaporating formaldehyde with an equal amount of water. The poultry house disinfection time is 12 to 24 hours. During fumigation and disinfection, cages or poultry containers should be sealed to prevent air leaks. When using formaldehyde vapor for fumigation and disinfection, the volume of the medication tank should not be less than 4 times the volume of the formaldehyde solution to prevent overflow during boiling. The disinfection temperature should not be lower than 15°C. The higher the humidity, the stronger the bactericidal effect. Upon initiating fumigation, personnel must immediately evacuate. After disinfection, open doors, windows, or containers and allow 3 to 4 days for ventilation and formaldehyde gas removal from the house.
To eliminate the typhoid bacillus in hatcheries, eggs can be fumigated in a separate room on racks for 20 to 30 minutes. Note that sterilized eggs cannot be stored, and chicks must hatch immediately. Alternatively, freshly hatched eggs can be fumigated with formaldehyde vapor in an incubator (between 1 to 2 hours) and ventilated immediately after disinfecting the hatching space.
Glutaraldehyde is another disinfectant that offers rapid action, low irritation and poisoning, and good safety. However, due to its high cost, it is not widely used in veterinary medicine.
Stage 7: Poultry House Sampling
After completing all the previous stages, it is now time to evaluate the microbiological results from the sampled environment. At least 8 random samples should be collected from each poultry house. Sampling should be carried out according to the table below. If the results are unacceptable, necessary measures and corrections should be implemented.

Cleaning and disinfection procedures for poultry houses are crucial and key to preventing pathogen transmission from one flock to another. The aim of these procedures is to minimize all microorganisms present in the poultry house and achieve optimal performance.
If the microbiological results indicate an unacceptable level of contamination, the following actions should be taken:
- Identify the source of contamination: Investigate the potential sources of contamination that may have contributed to the unacceptable results.
- Implement corrective measures: Address the identified sources of contamination by implementing appropriate corrective actions, such as enhanced cleaning and disinfection procedures, pest control measures, or adjustments to feed or water quality.
- Repeat sampling: Conduct follow-up sampling to assess the effectiveness of the corrective measures and ensure that the contamination levels have been reduced to acceptable levels.
Preparing the Poultry Broiler House for Day-Old Chicks
Before the arrival of day-old chicks, ensure you have completed the following:
- Pre-Heating the Brooder House: Activate the heating system several days before the chicks arrive to ensure a warm environment. This helps prevent the chicks from getting chilled. The brooder litter should be at a temperature of 28°C (82°F) for at least 24 hours before chick arrival. Measure the temperature throughout the brooder house using a thermometer placed on the litter surface and approximately 2 cm (0.8 inches) above the litter, as this is the level where the chicks will be positioned.
- Install Brooder Guards: Place brooder guards around the brooder area to confine the chicks to a smaller space initially until they grow large enough to explore the entire brooder house.
- Prepare Adequate Food and Water: Set up water and feed containers in the brooder house one day before chick arrival to allow them to reach room temperature.
- Be Ready for Chick Arrival: Ensure everything is in place and organized before the chicks arrive so you can focus on their care.
References